SAP_IBSO_TOOLS_PART3
Docker and Docker-Compose
Exercise 06 - Setting up the Database with Docker
In this exercise, you will create two Docker containers: a container for the database PostgreSQL and a container for a database administration tool Adminer, so that we can look into the created database tables and entries. You will connect the Java application to the database and test the application with a database connection.
Before
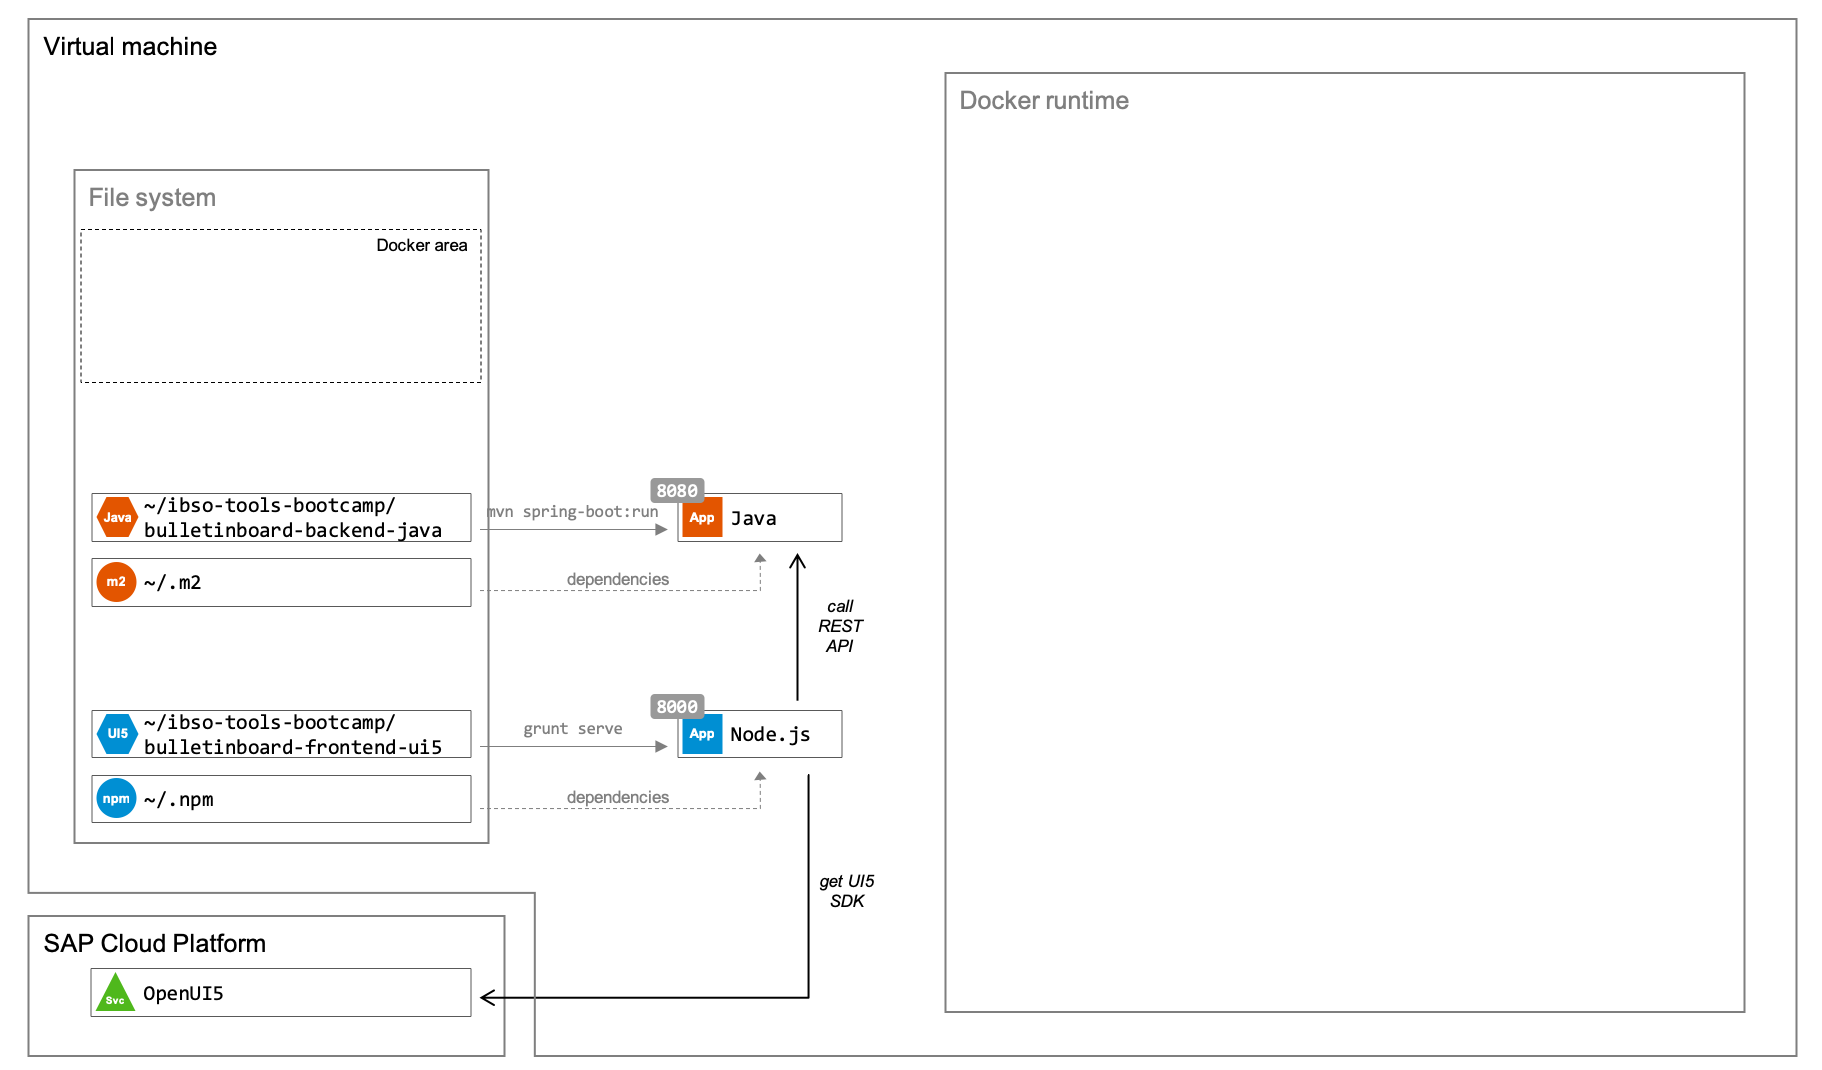
Overview Image
-
STEPS
-
STEP 1: Create a Container with the Database PostgreSQL
-
Go to hub.docker.com and search for
postgres. You will get several results. The first entrypostgreslooks has an official image badge and is the most frequently used one. -
In the section Supported tags, we find a tag which is called
11-alpine, which means that this release of the Docker image uses version 11 of PostgreSQL on top of an Alpine Linux distribution. Let’s use this one. -
Use docker to pull image from docker hub
docker pull postgres:11-alpine
-
To run the
postgresimagedocker run -d \
--name backend_postgres \
-e POSTGRES_PASSWORD=my?ecret \
-p 5432:5432 \
postgres:11-alpine
-d : means run the container in the background
--name: container's name
-p: expose the port in container format: <host port>:<container port>
-e : set environment variable which container will user to set password of postgres
-
Check the status of the
postgrescontainerdocker ps
-
-
Step 2 - Start the Java Application with Connection to the Database
-
Change the spring config file to connect the database. Have a look at the
application.ymlfile under the folder/src/main/resources/.spring:
profiles: postgres
datasource:
platform: pg
url: jdbc:postgresql://localhost:5432/postgres
username: postgres
password: "my?ecret"
jpa:
open-in-view: false
show-sql: true
hibernate:
ddl-auto: update -
Start the application with Spring Profile postgres
mvn spring-boot:run -Dspring-boot.run.profiles=postgres
-
Start the UI5 project
grunt serve --open
-
In the browser, the UI5 application is opened. In the UI5 application, add one or two new advertisements via the ➕ button.
-
Restart java project and refresh UI5 project you will find data is still available. The created advertisement is still persisted in the database.
-
You successfully connected your Java application to a PostgreSQL database!
-
-
-
STEP 3 - you can access into the
postgrescontainer to use SQL command to operate database-
Access into the
postgrescontainerdocker exec -it backend_postgres bash
-
Use the
psqlcommand line tool, which is installed in this container, to access thepostgresdatabasepsql -U postgres
You will see that the terminal changes to
postgres=#as you are now connected to thepostgresdatabase. -
List all tables in the database named
postgres\dt
-
You can user SQL to operate the database object
SELECT * FROM advertisement;
-
Leave the
psql command line tool with the following command:\q
-
Leave the container session by executing
exit -
You successfully attached to a running container and connected to the database in this container!
-
-
Step 4 - Create a Container for the Database Administration Tool Adminer
We already saw how we can get access to the database tables in a container. But it would be great if we also would have a more convenient tool, where we can have a look at the tables and data of this database and which is accessible via the browser. There is also a Docker image available on Docker Hub for this use case: Adminer
-
pull adminer image
docker pull adminer
-
To create a an Adminer container from the image, execute the following command:
docker run -d \
--name backend_postgres_admin \
--link backend_postgres \
-p 8086:8080 \
adminer
To give the Adminer container access to the PostgreSQL container from Step 1, we will use the option --link <name of container we want to connect to>:<link alias name>. -
In your browser, navigate to localhost:8086. You will see the Adminer logon page, from where you can connect to a database. Enter the following information and log on:
ield Value System select PostgresSQL Server enter backend_postgresUsername enter postgresPassword enter my?ecretDatabase enter postgres -
The login should succeed and you will see the table advertisement now.
-
Click on the table advertisement and on next page click on Select data. You will see the same data you already saw in the step before where you accessed the database via the psql command line tool in the container.
-
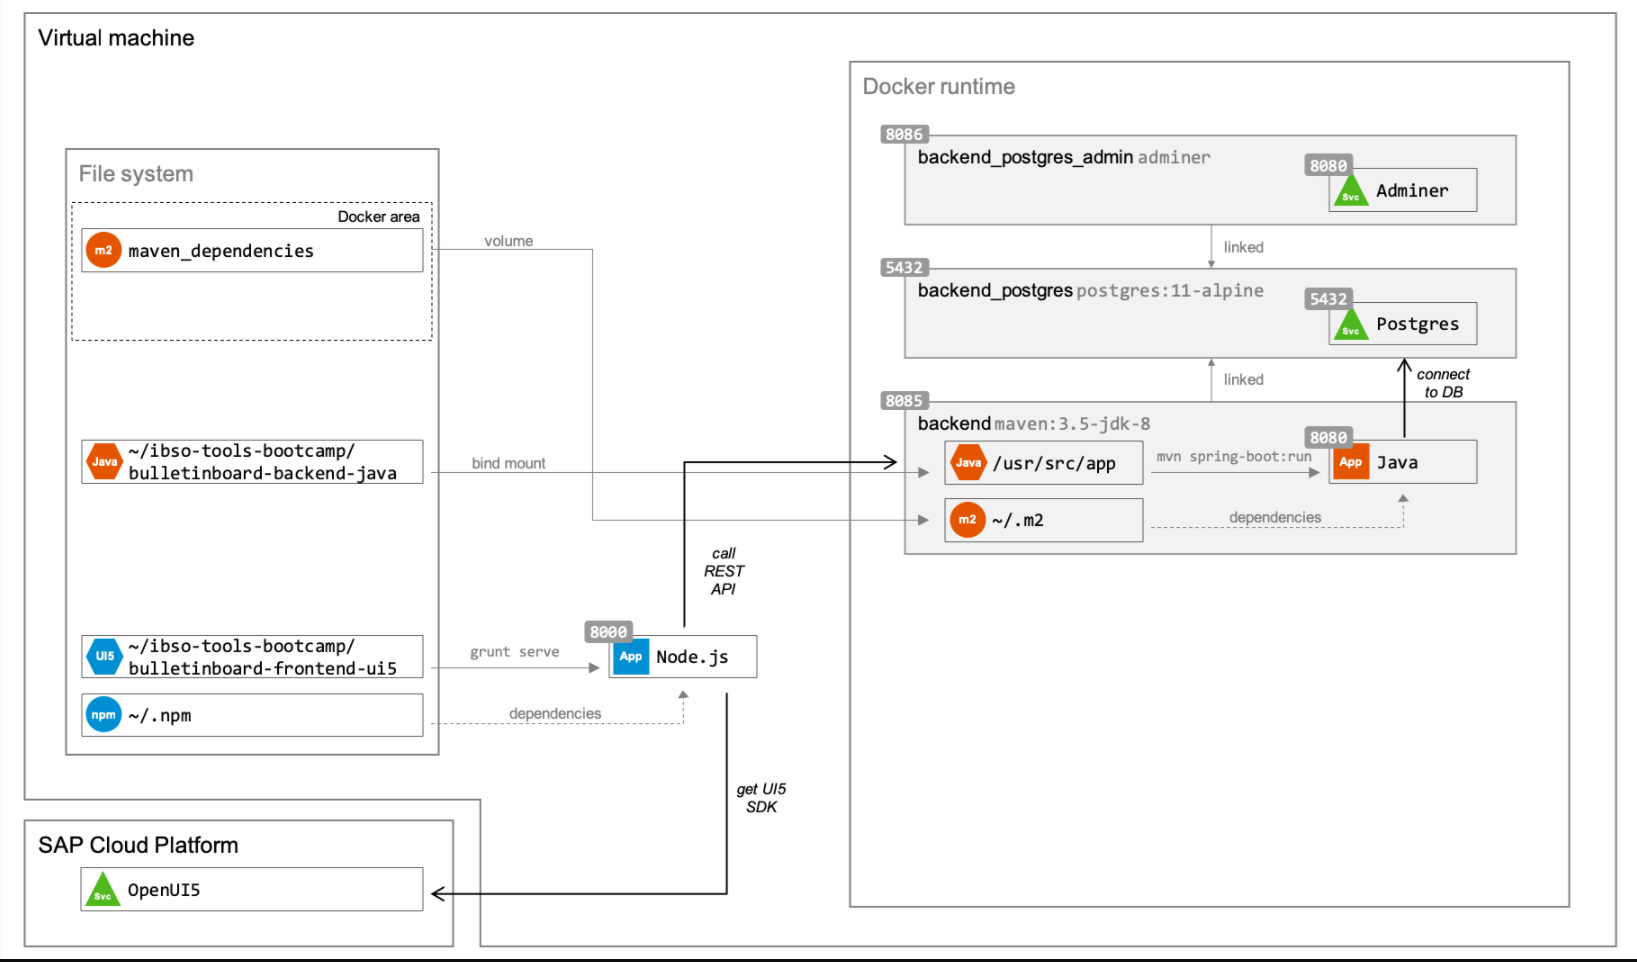
Exercise 07 - Running the Java Backend Application in a Docker Container
In this exercise, you will create a Docker container which builds and runs our Java application.
After this exercise, you will know how to execute commands during container creation and how to use volume mapping in order to provide data from the host machine to the Docker container.
Before
Overview image
-
STEPS
-
STEP 1 - Create a Container to Build and Run the Java Application
-
First to start the
posgresservicedocker start backend_postgres backend_postgres_admin
-
As we want to build and execute a Java application in a Docker container, we need a container with Maven installed. Let’s look for a Maven image on Docker Hub. Search for
maven. The first entry looks promising, as it has again a official image badge. Click on it to see the details. The Supported tags represent the Maven version and a JDK (Java Development Kit) version. We want to use Maven 3.5 and JDK 8. So let’s use the tag3.5-jdk-8. Download the Docker image from the central repository:docker pull maven:3.5-jdk-8
-
To create a Docker container from this image that builds and runs our application, we need to execute the
docker runcommand with a some options. Execute the following commands:if not yet done, create the named volume for the maven dependencies
docker volume create m2
execute the docker run command
docker run -d \
--name backend \
--link backend_postgres:db \
-p 8085:8080 \
-v ~/ibso-tools-bootcamp/bulletinboard-backend-java/src:/usr/src/app/src \
-v ~/ibso-tools-bootcamp/bulletinboard-backend-java/.m2:/usr/src/app/.m2 \
-v ~/ibso-tools-bootcamp/bulletinboard-backend-java/pom.xml:/usr/src/app/pom.xml \
-v m2:/root/.m2 \
-e SPRING_DATASOURCE_URL="jdbc:postgresql://backend_postgres:5432/postgres"\
-w /usr/src/app \
maven:3.5-jdk-8 \
mvn \
--settings ./.m2/settings.xml \
-Dspring-boot.run.profiles=postgres \
clean spring-boot:run
-v: Provides (aka mounts) the root directory of the Java project and all its content to /usr/src/app in the container. We use a volume for that, specifically a bind mount volume.
-v Mounts /root/.m2 inside the container to a named volume on the host (i.e. our virtual machine) called m2. We do this to cache the Maven dependencies of the Java application (defined in the pom.xml), which in our case are stored in /root/.m2. So the first time we run a Maven command in the container and the cache is empty, it will download all the dependencies and it will take quite some time. For any subsequent Maven command, it will take the cached dependencies and significantly reduce build time, even after restarting the container.
-e : Overwrites the database url in the application.yml by setting an environment variable. The default value in the config is jdbc:postgresql://localhost:5432/postgres, which will not work anymore because inside the container there's nothing listening on localhost:5432. Instead, we made the database (that's running in a different container) accessible as backend_postgres:5432 with the --link option above. That's why we need to update the url.
-w: workspace
mvn : The command that is executed when the container is started. It's similar to the command that we used before to run the Java application with the postgres profile. Additionally, we use our own Maven settings.xml, which ensures that all dependencies are retrieved from Nexus (our SAP-internal Maven repository). Note that this is a relative path that is resolved in the working directory (i.e. /usr/src/app). -
As the container runs in the background, we don’t know if the web server is already up and running (or still starting or downloading Maven dependencies). We can look into the logs of the container so see what’s going on. Execute the following command:
docker logs backend --follow
-
After the application started in the container, we can access it via localhost:8085/api/v1/ads. Note that we use port
8085instead of8080because of the-poption (i.e. port mapping). -
Before we can run the UI5 application against the containerized Java application, we need to adjust the reverse proxy configuration in the
package.json. Open thepackage.jsonin VS Code. -
In the
package.json, replacelocalhost:8080withlocalhost:8085and save the changes -
In the Terminal, run the UI5 application with
grunt serve --openand test it by creating, updating, or deleting advertisements.
-
-
*Step 2 - Access the Named Volume
m2-
Execute the following command in the Terminal to get details about the volume:
docker volume inspect m2
-
Got information
[
  {
    "Driver": "local",
    "Labels": {},
    "Mountpoint": "/var/lib/docker/volumes/m2/_data",
    "Name": "m2",
    "Options": {},
    "Scope": "local"
  }
] -
The Mountpoint attribute is the directory on the host (i.e. our virtual machine) where the data is persisted. Let’s have a look at the content of this folder. As this folder has restricted permission we have to execute the command as root user:
sudo ls -al /var/lib/docker/volumes/m2/_data
-
You will find a folder
repository. This is where all dependencies that Maven requires are stored. Have a look at this folder:sudo ls -al /var/lib/docker/volumes/m2/_data/repository
You should see a separate folder for each Maven dependency. When we restart the container, we will see that it starts much faster because of the cache.
-
-
Step 3 - Access the Mounted Folder inside the Container
-
Get into container
docker exec -it backend bash
-
Let’s now have a look at our mounted volume. Remember that we mapped the root directory of the Java project to
/usr/src/appinside the container. We also configured this directory as the working directory of the container, which means we should already be in that directory. Execute the following commands to show the content of thesrcfolder.cd src
ls -al -
As these directories are mapped (i.e. shared) and not copied, we can add files to the
srcdirectory on the host and see it also in the container. Let’s try that. Open a new Terminal tab and create an empty text file by executing the following command from the root directory of the Java project:cd ~/ibso-tools-bootcamp/bulletinboard-backend-java/src
touch text.txt
ls -al -
When you switch back to the other tab in the Terminal with the container session, you should see that the file is shared by executing the following command:
ls -al
You should see that the file we just created on the host is also available in the container.
-
🎉 You successfully attached to a running container!
-
-
Exercise 08 - Creating a Custom Docker Image
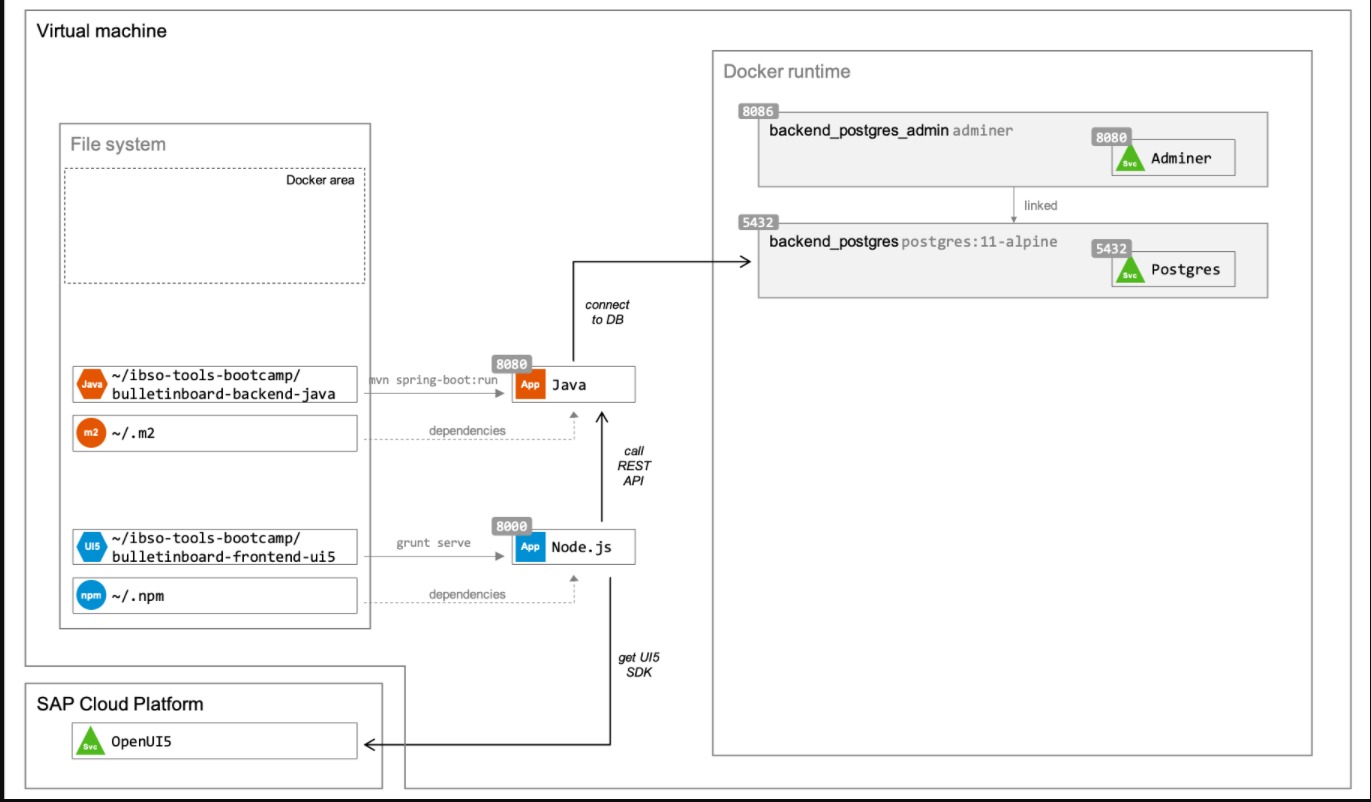
Before

Overview image
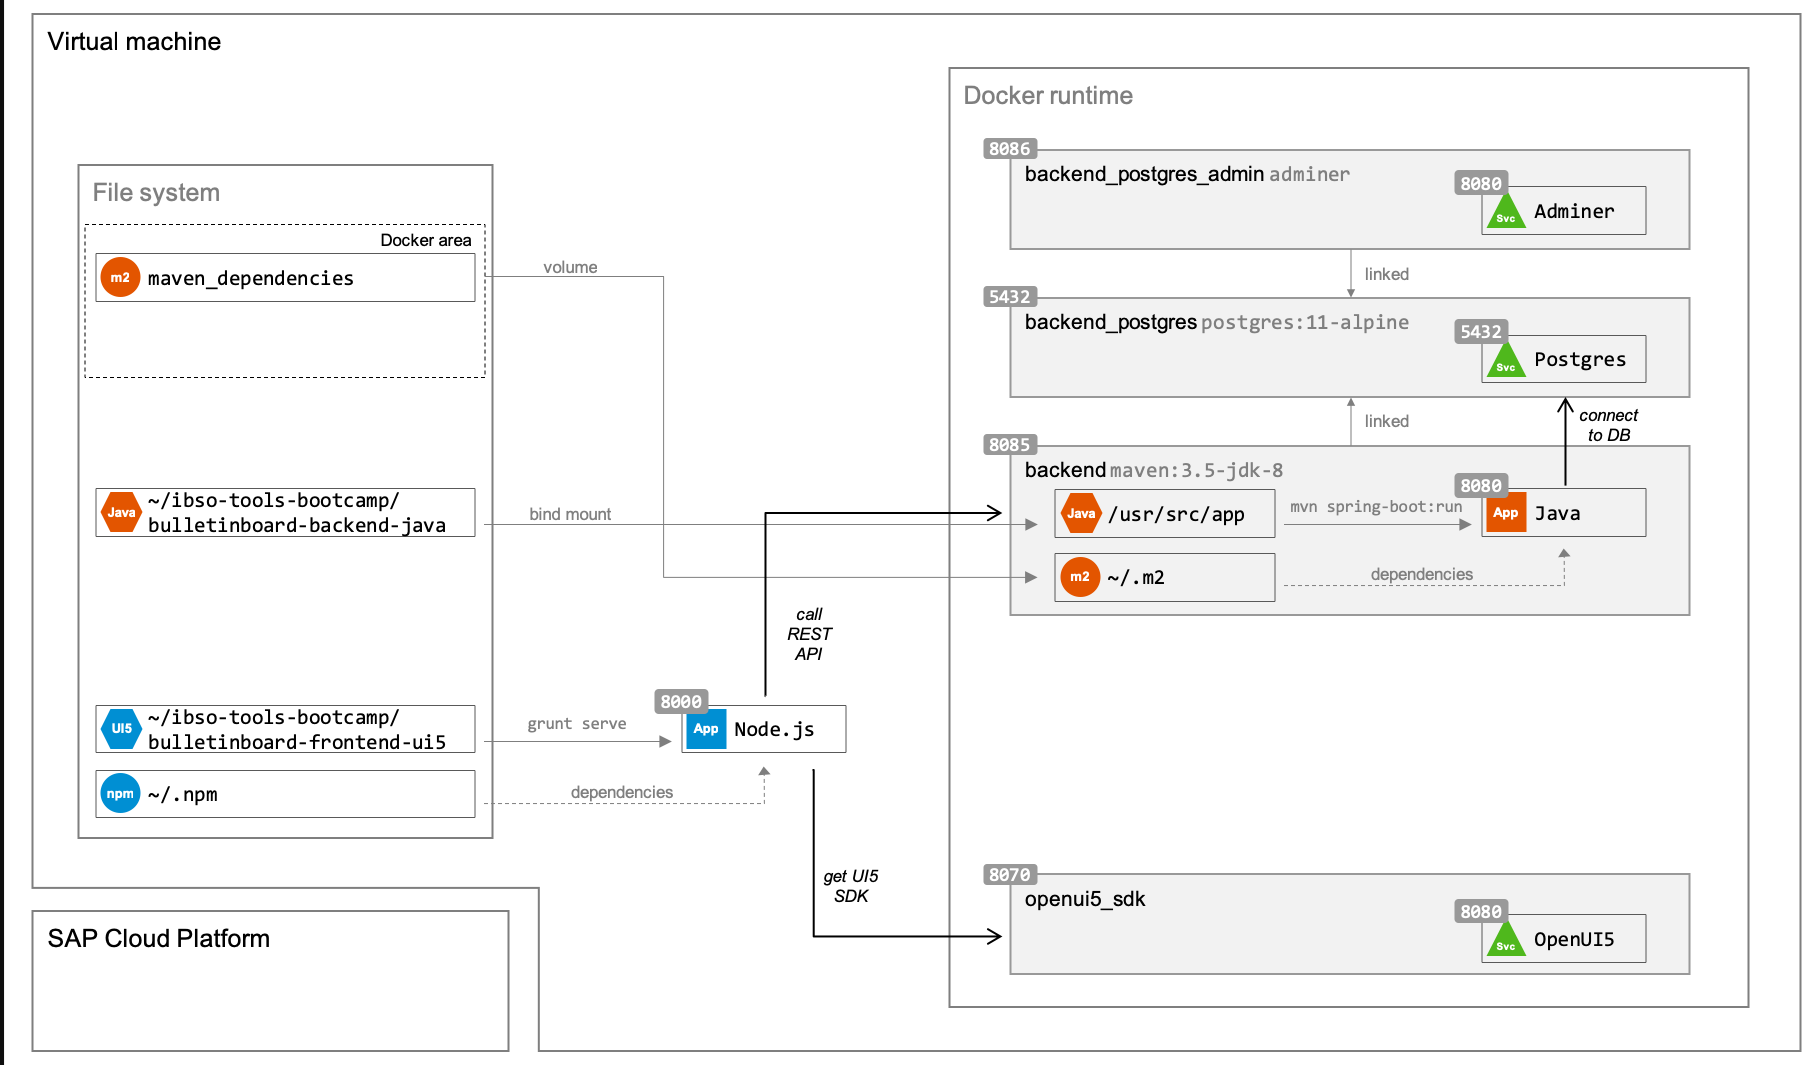
To increase our productivity when developing SAPUI5, we want to get rid of the latency for the SAPUI5 framework. We will download it once and package it into a custom Docker image, which will then serve SAPUI5 from our local machine.
-
STEPS
-
Step 1 - Hello World with nginx in Docker
-
Execute the following command to ensure that the containers from the previous exercise are running:
docker start backend_postgres backend_postgres_admin backend
-
Open the SAPUI5 project in VS Code.
-
Open the Terminal and navigate to the SAPUI5 project.
-
Create the missing
dockerandimage-openui5-sdkdirectories so that you have following directory structure:bulletinboard-frontend-ui5/
- docker/
- image-openui5-sdk/
- webapp/
- ... -
Open the
Dockerfileand add the following snippet as the first line. That like tells Docker to use a base image callednginx:1.17-alpine, which is available on Docker Hub.# Dockerfile
FROM nginx:1.17-alpine -
This single line is sufficient to create a custom image from that. In the Terminal, make sure you are in the
image-openui5-sdkdirectory. -
Execute the following command to build the Docker image from the
Dockerfile:docker build .
-
You should see something like
Successfully built <HASH>in the console. -
To start a container from that image, you can use
docker runlike we did in the previous exercises and use the hash as the image name (instead of e.g.postgres:11-alpine). Note that the web server nginx listens to port80by default, which you need to map to a port on your host machine (i.e. our virtual machine). Also note that once the container runs, you won’t see anything(!) in the Terminal until you access the web server from e.g. the browser.You can either try to put the
docker runcommand together by yourself based on the information above or use the following command:docker run -it -p 8070:80 <HASH>
-
In your browser, go to localhost:8070 and you should see the a welcome page of nginx.
-
In the Terminal, you should also see that accessing the web server produces traffic in the log.
-
Cancel the running container by pressing CTRL + C.
-
In VS Code, go back to your
Dockerfile. -
In order to serve some custom content with nginx, we only need to create an
index.htmlfile with some static content. We can do that in theDockerfile. Add the highlighted line to the end of theDockerfileto run a shell command. It creates anindex.htmlfile with the contentHello Worldat a default nginx path.# Dockerfile
FROM nginx:1.17-alpine
RUN echo "Hello World" > /usr/share/nginx/html/index.html -
Let’s build the image again and test it. This time, when we build the image, we will give it a name instead of just a hash (i.e. a tag). For that, switch to the Terminal and execute the following command:
docker build -t openui5-sdk .
-
To run a container from the image, we can now use the tag instead of the hash. Execute the following command to run the container:
docker run -it -p 8070:80 openui5-sdk
-
In your browser, go to localhost:8070 and you should see your Hello World.
-
In the Terminal, cancel the running container by pressing CTRL + C.
-
🎉 You successfully created an nginx container instance!
-
-
Step 2 - Build Custom Images Efficiently
When creating custom Docker images, it can many build-and-run cycles of trial and error until you finally got it right. Entering the same commands over and over again can become tedious then, but we can do something about it by creating a build script.
-
In VS Code, create a file called
build-and-runin theimage-openui5-sdkdirectory. You can do that by right-clicking on the folder and selecting New File. -
Add the following snippet as the first line to indicates that the content of the file should be interpreted as a bash script.
-
In the Terminal, navigate to the
image-openui5-sdkdirectory and execute the following command to make thebuild-and-runscript executable.chmod +x build-and-run
-
Add the highlighted line to the end of the
build-and-runfile to build the Docker image. Note that this is the same command that we used previously.!/bin/bash
docker build -t openui5-sdk . -
Below
docker build, add the highlighted lines to run a container with our Docker image:!/bin/bash
docker build -t openui5-sdk .
docker run -d \
--rm \
-p 8070:80 \
--name openui5-sdk-test \
openui5-sdk -
To indicate that nginx has actually started, add the highlighted line to the of the
build-and-runfile:!/bin/bash
docker build -t openui5-sdk .
docker run -d \
--rm \
-p 8070:80 \
--name openui5-sdk-test \
openui5-sdk
echo "Listening to localhost:8070, try http://localhost:8070" -
To avoid conflicts with Docker containers from a previous script execution (e.g. same name or port already allocated), add the highlighted command before
docker build.!/bin/bash
docker stop openui5-sdk-test
docker build -t openui5-sdk .
docker run -d \
--rm \
-p 8070:80 \
--name openui5-sdk-test \
openui5-sdk
echo "Listening to localhost:8070, try http://localhost:8070" -
Verify your
build-and-runscript: it should have thedocker stopcommand, followed bydocker buildand thendocker run. -
In the Terminal, make sure you are in the
image-openui5-sdkdirectory. -
As the
build-and-runscript is ready, execute the following command to run the steps:./build-and-run
-
In your browser, go to localhost:8070 and verify that the server is running properly.
-
In the Terminal, execute the script again and make sure that there are no errors.
-
🎉 You successfully created a Bash script to efficiently build-and-test a Docker image during development!
-
-
Step 3 - Package SAPUI5 in Docker
-
In VS Code, create a file called
nginx.confin theimage-openui5-sdkdirectory and paste in the content below. This simple configuration tells nginx to listen to port80(inside the container) and to serve files in the folder/var/www.server {
listen 80;
root /var/www/;
# avoid caching
# see https://stackoverflow.com/questions/40243633/disable-nginx-cache-for-javascript-files
add_header Last-Modified $date_gmt;
add_header Cache-Control 'no-store, no-cache, must-revalidate, proxy-revalidate, max-age=0';
if_modified_since off;
expires off;
etag off;
} -
To copy this file to the Docker image, add the highlighted
COPYcommand to the end of theDockerfile:# Dockerfile
FROM nginx:1.17-alpine
RUN echo "Hello World" > /usr/share/nginx/html/index.html
COPY ./nginx.conf /etc/nginx/conf.d/default.conf -
As the new nginx configuration listens to port
80(like before), we should document this in theDockerfile. Add the highlighted command to the end of theDockerfile:# Dockerfile
FROM nginx:1.17-alpine
RUN echo "Hello World" > /usr/share/nginx/html/index.html
COPY ./nginx.conf /etc/nginx/conf.d/default.conf
EXPOSE 80 -
As the new nginx configuration serves files from
/var/www, we need to make sure that this folder exists inside the image. Add the highlighted command afterFROMin theDockerfile. The-poption makes sure that any intermediate directories are also created.# Dockerfile
FROM nginx:1.17-alpine
RUN mkdir -p /var/www
RUN echo "Hello World" > /usr/share/nginx/html/index.html
COPY ./nginx.conf /etc/nginx/conf.d/default.conf
EXPOSE 80 -
From the Terminal, run the following command to copy the OpenUI5 SDK zip file into the same folder as your
Dockerfile. We’ll copy them into the image in the next steps.cp ~/openui5-sdks/*.zip \
~/ibso-tools-bootcamp/bulletinboard-frontend-ui5/docker/image-openui5-sdk/Why OpenUI5 and not SAPUI5? The only reason we are using OpenUI5 instead of SAPUI5 is that the framework is much smaller and all related tasks will be a bit faster during the exercises.Everything we describe here is also applicable to SAPUI5.In a real scenario, you would probably package SAPUI5 into a container instead of OpenUI5. Copying vs. downloading the OpenUI5 SDK Usually, we would download our artifacts from their official source on-the-fly as part of the Dockerfile. For OpenUI5, this would be openui5.org/releases. For SAPUI5, this would ideally be Nexus.As this could become a bottleneck with multiple participants downloading the SDK in parallel and multiple times, we instead copy the SDK from the VM’s file system into the Docker container. -
In the
Dockerfile, add the highlighted command right after creating the/var/wwwdirectory.Dockerfile
FROM nginx:1.17-alpine
RUN mkdir -p /var/www
COPY ./openui5-sdk-1.72.x.zip /var/www/openui5-sdk-1.72.x.zip
RUN echo "Hello World" > /usr/share/nginx/html/index.html
COPY ./nginx.conf /etc/nginx/conf.d/default.conf
EXPOSE 80About downloading from Nexus/openui5.org As explained in a previous info box, we would rather download the artifact on-the-fly in the Dockerfileinstead of copying a local zip file.You could do that with wgetcommand like this one here for example:for OpenUI5
RUN wget https://github.com/SAP/openui5/releases/download/1.72.5/openui5-sdk-1.72.5.zip -P /var/www
for SAPUI5
wget https://nexusmil.wdf.sap.corp:8443/nexus/service/local/repo_groups/build.releases/content/com/sap/ui5/dist/sapui5-sdk-dist/1.72.5/sapui5-sdk-dist-1.72.5-opt-static.zip -P /var/wwwNote that we do not recommend to try this now as network might be rather slow, depending on the location. If you still decide to try it out (which we really don’t recommend), you might get an error along the lines of server returned error: HTTP/1.1 404 Not Found. That’s because the patch version might not be available for download anymore. Check the available OpenUI5 releases and adjust the URL if necessary. -
We need to extract the content of the zip archive, which we can do with
unzip. Add the highlighted command afterCOPY:Dockerfile
FROM nginx:1.17-alpine
RUN mkdir -p /var/www
COPY ./openui5-sdk-1.72.x.zip /var/www/openui5-sdk-1.72.x.zip
RUN unzip -o /var/www/openui5-sdk-1.72.x.zip -d /var/www
RUN echo "Hello World" > /usr/share/nginx/html/index.html
COPY ./nginx.conf /etc/nginx/conf.d/default.conf
EXPOSE 80 -
In the Terminal, build the image by executing the
./build-and-runscript again. It will run through all the different commands of theDockerfileand also copy the OpenUI5 SDK. -
Once the build is complete and the container is running, go to localhost:8070 in your browser. You should see the landing page of OpenUI5, which is now served from your container.
-
In VS Code, in the
Dockerfile, find the Hello WorldRUNcommand from Step 1 and remove the line. -
In the Terminal, build the image again by executing the
./build-and-runscript.When you look closely, you will note that Docker doesn’t build the entire image from scratch, but that it takes some of the layers from the cache.
-
-
Step 4 - Integrate Image with SAPUI5
-
In the Terminal, execute the
./build-and-runscript again without any argument to make sure that a container with a recent SAPUI5 version is running. -
In VS Code, open the
package.jsonfile in the root directory of the SAPUI5 project. Find theresourcesandtestResourcesparameters, which are pointing toopenui5.hana.ondemand.com.Use the following values instead:
"sapui5": {
  "version": "1.72.5",
  "resources": "http://localhost:8070/resources",
  "testResources": "http://localhost:8070/test-resources",
  "defaultPage": "webapp/index.html",
  "libs": {},
  ...
} -
In the Terminal, make sure you are in the root directory of the SAPUI5 project. Execute the following command to start the web server for the SAPUI5 app and open the browser:
grunt serve --open
-
In a different Terminal tab, attach to the log stream of your Docker container by executing the following command:
docker logs openui5-sdk-test --follow
-
In the browser, you should see that your application is running successfully. When you look into the logs, you should see some log traffic every time you refresh the URL, because the SAPUI5 resources are now served from your container and not from
openui5.hana.ondemand.comanymore. -
🎉 You successfully connected your UI5 application to your custom Docker container.
-
-
Exercise 08.01 - Reusing Docker Images with Build Arguments
In this exercise, you will leverage the same Dockerfile for creating multiple custom Docker images to host different OpenUI5 SDK versions.
After this exercise, you will understand how to leverage build arguments in a Dockerfile.
-
Steps
-
Step 1 - Use Variables in Build-and-Run
-
To further improve the
build-and-runscript, we can introduce variables to ease maintenance. We can define variables withMY_VAR="MY_VALUE"(note: no space before or after=!). Introduce variablesCONTAINER_NAME,IMAGE_NAME, andHOST_PORTwith the respective values and make sure that all occurrences in thedockerandechocommands are replaced, for example:CONTAINER_NAME="openui5-sdk-test"
docker stop $CONTAINER_NAME -
Execute the
build-and-runscript with./build-and-runand make sure that there are no errors. -
In your browser, go to localhost:8070 and verify that the server is running properly.
-
🎉 You successfully introduced variables to the
build-and-runscript!
-
-
Step 2 - Introduce Build Arguments
We can leverage the same
Dockerfilefor different SAPUI5 versions. For that, we need to make theDockerfilemore flexible by introducing so-called build arguments.-
In VS Code, make sure the
Dockerfileis open. Add the following command afterFROMin theDockerfile. It defines a build argumentSAPUI5_VERSIONwith a default value.ARG SAPUI5_VERSION=1.72.x
-
Replace the two occurrences of the SAPUI5 version
1.72.xwith a reference to the build argument. You can do that with$SAPUI5_VERSION, e.g.:COPY ./openui5-sdk-$SAPUI5_VERSION.zip /var/www/openui5-sdk-$SAPUI5_VERSION.zip
-
Make sure to open the
build-and-runscript. Although theSAPUI5_VERSIONbuild argument has a default value, we should explicitly reflect the SAPUI5 version in the script. Add aSAPUI5_VERSIONvariable with the value1.72.xto the top of the file (note: no space before or after=!)SAPUI5_VERSION="1.72.x"
-
To reflect the SAPUI5 version of the image in the image name, change the name in the script as follows:
openui5-sdk:1.72.x. -
Build arguments are set by passing the
--build-argoption andKEY=VALas value, e.g.--build-arg MY_VAR=MY_VAL. Adjust thedocker buildscript so that theSAPUI5_VERSIONbuild argument is set from the variable we just introduced.--build-arg SAPUI5_VERSION=$SAPUI5_VERSION
-
In the Terminal, execute the
./build-and-runscript. You should see that it fully rebuilds the image, because theDockerfilechanged compared to the previous build. Although it’s semantically the same, a new layer was introduced by adding theARGinstruction. -
We can modify the
build-and-runscript so that it allows to specify the SAPUI5 version from the Terminal (e.g../build-and-run "1.70.x").Replace the static declaration of the
SAPUI5_VERSIONvariable in thebuild-and-runscript with the following if-else block:if [ -z $1 ]; then # if first argument is empty
SAPUI5_VERSION="1.72.x"
else
SAPUI5_VERSION=$1
fi -
In the Terminal, execute the
./build-and-runscript again. You should see that Docker doesn’t have to re-build the image, but that all layers are served from cache. -
Execute the
build-and-runscript again to with a parameter to create a separate image for the other OpenUI5 SDK version that we have available:./build-and-run "1.70.x"
You should see the script considers the parameter, passes it on to
docker runand then builds a new image, as there are no layers for this SAPUI5 version in the cache. -
🎉 You successfully used build arguments to make your Docker image more flexible!
-
-
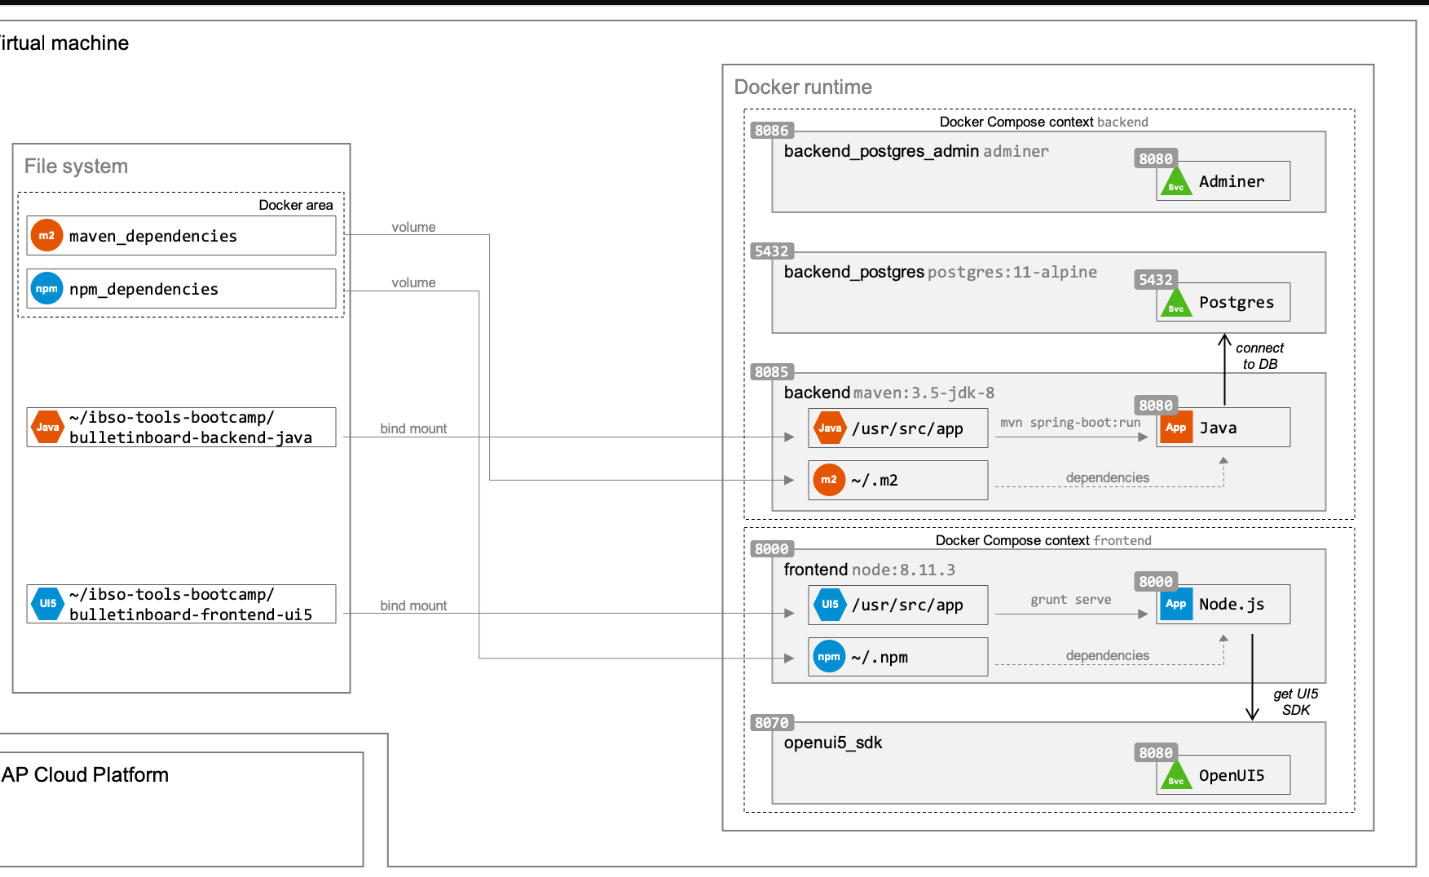
Exercise 09 - Describing the Development Environment with Docker Compose
- Dockerfile: build docker image
- Docker-compose: Compose file is what’s used to deploy an instance of that image as a container.
BEFORE:

AFTER:
Step 1 - Docker Compose for the SAPUI5 Application
-
Open the Terminal and navigate to the SAPUI5 project.
-
Open the SAPUI5 project in VS Code.
-
In VS Code, create a file called
docker-compose.ymlin the root directory of the SAPUI5 project. In VS Code, you can do that by scrolling to the end of the file tree, right-clicking below the last file and selecting New File. -
First, we add a service (aka container) to our
docker-compose.ymlfile for our custom image. For that, we provide the same set of parameters than we did before, such as the path to theDockerfileand the port mapping when running the container. Add the highlighted snippet to thedocker-compose.ymlfile forservices:version: '2.1'
services:
openui5_sdk:
build:
context: docker/image-openui5-sdk
restart: always
ports:
- 8090:80
#volumes: -
In the Terminal, execute the following command to start what is described in
docker-compose.yml. What this command will do is to build the image if not cached yet (docker build) and run the container (docker run).docker-compose up -d
Similar to what we know from
docker run, the-doption executes everything that is described in thedocker-compose.ymlfile as daemon (i.e. in the background).If you run
docker-compose up(without-d), it will attach to the logs of all the containers and stream them to the Terminal. -
In the browser, navigate to localhost:8090 and you should see the SAPUI5 SDK landing page from the container that you started with Docker Compose.
-
Execute the following command to stop the containers you started with Docker Compose:
docker-compose down
-
Before we can add a container for the SAPUI5 application to Docker Compose, we need to make some changes to its configuration.
In VS Code, open the
package.jsonfile from the root directory of the SAPUI5 project. Find theresourcesandtestResourcesparameters, which are pointing tohttp://localhost:8070.Replace them with the following:
"sapui5": {
  "version": "1.72.5",
  "resources": "${SAPUI5_HOST:-https://openui5.hana.ondemand.com}/resources",
  "testResources": "${SAPUI5_HOST:-https://openui5.hana.ondemand.com}/test-resources",
  "defaultPage": "webapp/index.html",
  ...
}- Remember that when we ran the SAPUI5 SDK container with Docker Compose, we used a different port (
8090instead of8070). Also, the hostname isn’tlocalhostin Docker Compose, but rather the name of the container (like we know it from--link). - With the new parameter values, we to make the URLs configurable through environment variables. It’s a Bash-style syntax, that either takes the value from the
SAPUI5_HOSTenvironment variable if defined or uses the value specified after:-as a fallback:
- Remember that when we ran the SAPUI5 SDK container with Docker Compose, we used a different port (
-
With the SAPUI5 resources URL configurable, we can add the SAPUI5 application also as a service (aka container) to our
docker-compose.yml.Add the highlighted snippet to the
docker-compose.ymlfile underservices(sequence of services is irrelevant):version: '2.1'
services:
openui5_sdk:
build:
context: docker/image-openui5-sdk
restart: always
ports:
- 8090:80
frontend:
image: node:12.13.0
command: bash -c "npm install && npx grunt serve"
working_dir: /usr/src/app
restart: always
ports:
- 8000:8000
volumes:
- ./.npmrc:/usr/src/app/.npmrc
- ./webapp:/usr/src/app/webapp
- ./package.json:/usr/src/app/package.json
- ./Gruntfile.js:/usr/src/app/Gruntfile.js
- node_modules:/usr/src/app/node_modules
- npm:/root/.npm
environment:
SAPUI5_HOST: http://openui5_sdk:80
#volumes:-
All the parameters in the
docker-compose.ymlfile can be translated to adocker runcommand. They are mostly concepts that we already learned about such as the image name, commands to execute, and port and volume mapping.Note that:
- when we refer to the container with the OpenUI5 SDK in the
SAPUI5_HOSTvariable, we do that with the container name and the internal port, not the mapped port. - we cache the
node_modulesthat are installed in the project directory. - we cache the
npmdependencies that are downloaded from the central registry. - we use
bash -c CMDSto execute multiple commands (i.e.&&), which you can also use withdocker runto execute multiple commands in sequence.
- when we refer to the container with the OpenUI5 SDK in the
-
-
Note that above, there are two named volumes defined,
node_modulesandnpm, which serve as caches for dependencies. Any named volumes need to be defined in Docker Compose (similar todocker volume create). Add the highlighted lines to thedocker-compose.ymlfile forvolumes:version: '2.1'
services:
openui5_sdk:
build:
context: docker/image-openui5-sdk
restart: always
ports:
- 8090:80
frontend:
image: node:12.13.0
command: bash -c "npm install && npx grunt serve"
working_dir: /usr/src/app
restart: always
ports:
- 8000:8000
volumes:
- ./.npmrc:/usr/src/app/.npmrc
- ./webapp:/usr/src/app/webapp
- ./package.json:/usr/src/app/package.json
- ./Gruntfile.js:/usr/src/app/Gruntfile.js
- node_modules:/usr/src/app/node_modules
- npm:/root/.npm
environment:
SAPUI5_HOST: http://openui5_sdk:80
volumes:
node_modules:
name: node_modules
npm:
name: npm -
In the Terminal, execute Docker Compose with
docker-compose up -d. This command now starts two containers, as specified indocker-compose.yml. -
In the browser, navigate to localhost:8000/webapp and you should see your SAPUI5 application, served with SAPUI5 resources from the other container, and started with just a single command.
Important
Don’t worry if you see an error message. That’s because the SAPUI5 application again cannot connect to the Java backend as it’s not reachable from the Docker container. We will fix this in Exercise 10.
-
Execute
docker-compose logs --followto stream the logs in the Terminal. Refresh the URL in the browser and note that the Terminal shows information from both containers, only with a different prefixes. -
In the Terminal, detach from the logging stream by pressing CTRL + C.
-
You can stop both containers with
docker-compose down -
🎉 You successfully used Docker Compose to run the UI5 application!
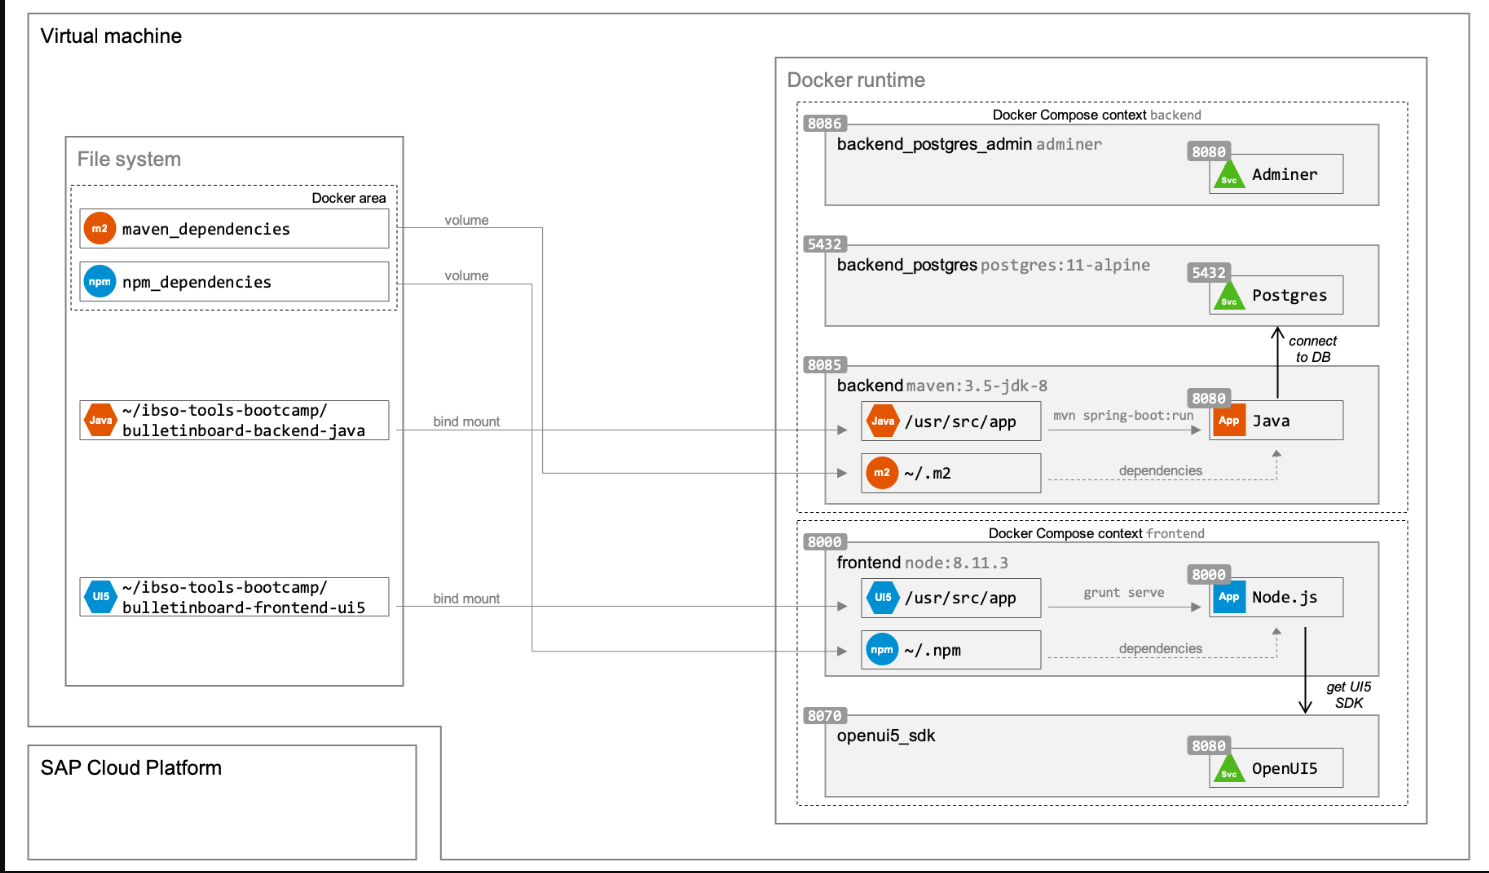
Step 2 - Docker Compose for the Java Application
-
Open the Terminal and navigate to the Java project.
-
Open the Java project in VS Code.
-
In VS Code, create a file called
docker-compose.ymlin the root directory of the Java project. In VS Code, you can do that by scrolling to the end of the file tree, right-clicking below the last file and selecting New File. -
First, we add a service (aka container) to our
docker-compose.ymlfile for the PostgreSQL database.Add the highlighted snippet to the
docker-compose.ymlfile forservices:version: '2.1'
services:
backend_postgres:
image: postgres:11-alpine
restart: always
ports:
- 5432:5432
volumes:
- backend_postgres_data:/var/lib/postgresql/data
environment:
POSTGRES_PASSWORD: "my?ecret"
volumes:
backend_postgres_data:
name: backend_postgres_data -
Next, we add another service for Adminer.
Add the highlighted snippet to the
docker-compose.ymlfile underservices(sequence of services is irrelevant):version: '2.1'
services:
backend_postgres:
image: postgres:11-alpine
restart: always
ports:
- 5432:5432
volumes:
- backend_postgres_data:/var/lib/postgresql/data
environment:
POSTGRES_PASSWORD: "my?ecret"
backend_postgres_admin:
image: adminer
restart: always
ports:
- 8086:8080
volumes:
- ./.adminer/index.php:/var/www/html/index.php
environment:
ADMINER_DEFAULT_DRIVER: "pgsql"
ADMINER_DEFAULT_SERVER: "backend_postgres"
ADMINER_DEFAULT_USERNAME: "postgres"
ADMINER_DEFAULT_PASSWORD: "my?ecret"
ADMINER_DEFAULT_DB: "postgres"
volumes:
backend_postgres_data:
name: backend_postgres_data-
We are mounting a custom
index.phpfile into Adminer. It’s a script that we created based on a blog post, which allows to set all logon parameters via environment variables. To use this enhancement of Adminer, we only need to mount it into the respective container and then set the respective environment variable.Without the modification, whenever you access Adminer, you would need to enter the credentials and connection details for the test database manually, which is quite tedious and inefficient.
Feel free to open the
index.phpfile in VS Code. We recommend not to change it though!We should rather create a custom Docker image that contains these modifications rather than modifying Adminer every time we use it but that’s out of scope for now.
-
-
In the Terminal, execute Docker Compose with
docker-compose up -d. -
In the browser, navigate to localhost:8086 and you should see the Adminer interface. This time, all the form fields should be pre-filled with the correct values. Press Login to verify this behavior.
-
To complete the Docker Compose setup, we need to add a service for the Java container that executes the Maven commands.
Add the highlighted snippet to the
docker-compose.ymlfile underservices(sequence of services is irrelevant):version: '2.1'
services:
backend_postgres:
image: postgres:11-alpine
restart: always
ports:
- 5432:5432
volumes:
- backend_postgres_data:/var/lib/postgresql/data
environment:
POSTGRES_PASSWORD: "my?ecret"
backend_postgres_admin:
image: adminer
restart: always
ports:
- 8086:8080
volumes:
- ./.adminer/index.php:/var/www/html/index.php
environment:
ADMINER_DEFAULT_DRIVER: "pgsql"
ADMINER_DEFAULT_SERVER: "backend_postgres"
ADMINER_DEFAULT_USERNAME: "postgres"
ADMINER_DEFAULT_PASSWORD: "my?ecret"
ADMINER_DEFAULT_DB: "postgres"
backend:
image: maven:3.5-jdk-8
command: mvn --settings ./.m2/settings.xml clean spring-boot:run -Dmaven.clean.failOnError=false
working_dir: /usr/src/app
restart: always
ports:
- 8085:8080
volumes:
- ./src:/usr/src/app/src
- ./.m2:/usr/src/app/.m2
- ./pom.xml:/usr/src/app/pom.xml
- m2:/root/.m2
environment:
SPRING_PROFILES_ACTIVE: "postgres"
SPRING_DATASOURCE_URL: "jdbc:postgresql://backend_postgres:5432/postgres"
SPRING_DATASOURCE_PASSWORD: "my?ecret"
volumes:
backend_postgres_data:
name: backend_postgres_data
m2:
name: m2 -
In the Terminal, execute Docker Compose with
docker-compose up -dagain. You should see the application starting without any error. -
In the browser, navigate to localhost:8085/hello/World and you should see the Hello World text.
-
🎉 You successfully used Docker Compose to run the Java application!
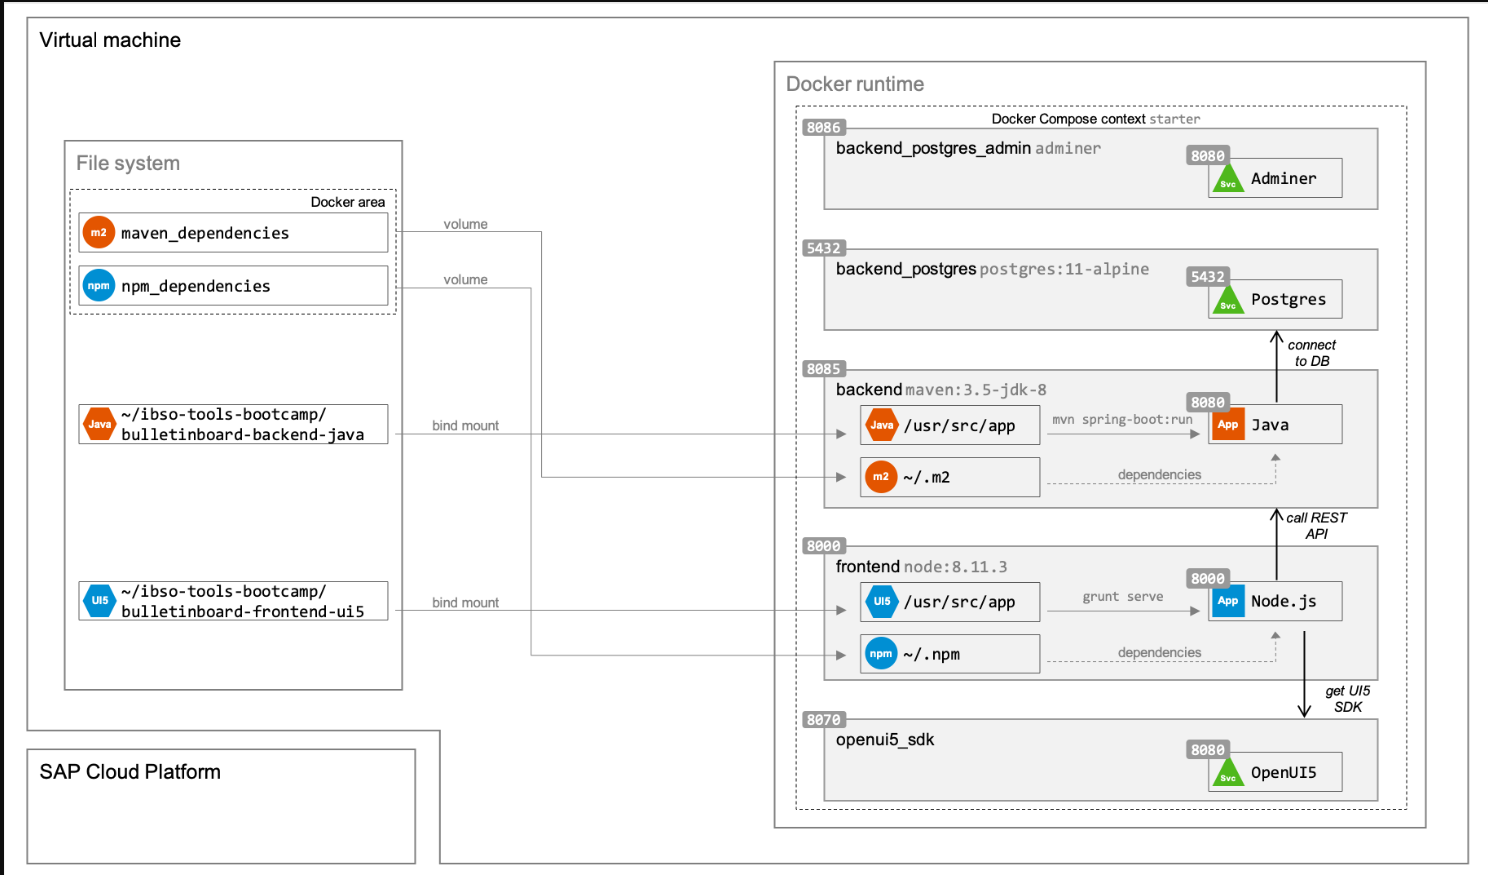
Exercise 10 - Integrating Multiple Docker Compose Files
In this exercise, you will round up the Docker Compose setup and enable livereload, debugging, and bring Java and SAPUI5 together.
After this exercise, you will understand how to orchestrate several containers.
BEFORE:
AFTER:
Step 1 - Integrate Java and SAPUI5 with Docker Compose
Both the Java and the SAPUI5 application themselves are now wrapped with Docker Compose and ready for development. The problem is that while the Java service is accessible via localhost:8085 on your host machine, the SAPUI5 container doesn’t know how to access that localhost. The solution is to bring both docker-compose.yml scripts together.
In VS Code, open the SAPUI5 project and open the package.json file from the root directory of the project. Find the proxies parameter.
Replace both occurrences of http://localhost:8085 with the following (but leave the rest of the URI as is):
Copied to clipboard
${BULLETINBOARD_BACKEND_HOST:-http://localhost:8085} |
-
Open the Terminal and navigate to your Tools Bootcamp workspace, where you already have directories for the Java and SAPUI5 projects (e.g.
cd ~/ibso-tools-bootcamp) -
Create the missing
docker-playgrounddirectory so that you have following directory structure:ibso-tools-bootcamp/
- bulletinboard-backend-java/
- ...
- bulletinboard-frontend-ui5/
- ...
- docker-playground/
- ... -
Navigate into the newly created
docker-playgrounddirectory. -
Run the following command to open the project in VS Code:
code .
-
Create a file called
docker-compose.ymlin root directory of thedocker-playgroundproject. In VS Code, you can do that by scrolling to the end of the file tree, right-clicking below the last file and selecting New File. -
Include the
frontendservices from the Docker Compose script of the SAPUI5 project by extending your currentdocker-compose.ymlfile with existing definition.Add the highlighted snippet to the
docker-compose.ymlfile forservices:Copied to clipboard
version: '2.1'

services:
  frontend:
    extends:
      file: ./../bulletinboard-frontend-ui5/docker-compose.yml
      service: frontend

#volumes: -
Based on that syntax, we can add the other services. Add the highlighted snippet to the
docker-compose.ymlfile:version: '2.1'
services:
frontend:
extends:
file: ./../bulletinboard-frontend-ui5/docker-compose.yml
service: frontend
openui5_sdk:
extends:
file: ./../bulletinboard-frontend-ui5/docker-compose.yml
service: openui5_sdk
backend:
extends:
file: ./../bulletinboard-backend-java/docker-compose.yml
service: backend
backend_postgres:
extends:
file: ./../bulletinboard-backend-java/docker-compose.yml
service: backend_postgres
backend_postgres_admin:
extends:
file: ./../bulletinboard-backend-java/docker-compose.yml
service: backend_postgres_admin
#volumes: -
Add the highlighted named volumes to the
volumessection of the newdocker-compose.ymlfile of thedocker-playgroundproject:version: '2.1'
services:
frontend:
extends:
file: ./../bulletinboard-frontend-ui5/docker-compose.yml
service: frontend
openui5_sdk:
extends:
file: ./../bulletinboard-frontend-ui5/docker-compose.yml
service: openui5_sdk
backend:
extends:
file: ./../bulletinboard-backend-java/docker-compose.yml
service: backend
backend_postgres:
extends:
file: ./../bulletinboard-backend-java/docker-compose.yml
service: backend_postgres
backend_postgres_admin:
extends:
file: ./../bulletinboard-backend-java/docker-compose.yml
service: backend_postgres_admin
volumes:
backend_postgres_data:
name: backend_postgres_data
m2:
name: m2
node_modules:
name: node_modules
npm:
name: npm -
About named volumes and inheritance
While most configuration is inherited when extending a Docker Compose configuration, named volumes are not. They need to be re-declared explicitly.
The named volumes above are the ones that we already declared in the
docker-compose.ymlfiles of the SAPUI5 and Java project. -
With the central Docker Compose configuration, we can now wire the SAPUI5 container to the Java container. For that, define an environment variable in the
docker-compose.ymlfile of thedocker-playgroundproject for thefrontendservice with the nameBULLETINBOARD_BACKEND_HOSTand valuehttp://backend:8080:version: '2.1'
services:
frontend:
extends:
file: ./../bulletinboard-frontend-ui5/docker-compose.yml
service: frontend
environment:
BULLETINBOARD_BACKEND_HOST: http://backend:8080
openui5_sdk:
extends:
file: ./../bulletinboard-frontend-ui5/docker-compose.yml
service: openui5_sdk
backend:
extends:
file: ./../bulletinboard-backend-java/docker-compose.yml
service: backend
backend_postgres:
extends:
file: ./../bulletinboard-backend-java/docker-compose.yml
service: backend_postgres
backend_postgres_admin:
extends:
file: ./../bulletinboard-backend-java/docker-compose.yml
service: backend_postgres_admin
volumes:
backend_postgres_data:
name: backend_postgres_data
m2:
name: m2
node_modules:
name: node_modules
npm:
name: npm -
Before testing the setup and avoid port issues, make sure to stop all running Docker containers by executing the following command in the Terminal:
docker stop $(docker ps -aq)
-
In the Terminal, execute Docker Compose with
docker-compose up -d. -
Execute the following command to follow the logs of the containers:
docker-compose logs --follow
-
In the browser, navigate to localhost:8000/webapp and you should see the SAPUI5 application. Use the user interface to create an advertisement.
-
Restart all Docker Compose containers by executing the following command:
docker-compose restart
-
In the browser, again navigate to localhost:8000/webapp and you should still see the data that you previously created.
-
🎉 You successfully described major parts of your development environment with Docker Compose!
Exercise 10.01 - Enabling Livereload in Docker Compose for SAPUI5
After this exercise, you will understand what needs to be considered for enabling live reload in a Docker setup.
The SAPUI5 tool custdev-sapui5-infra-util that we are using automatically looks for a free port for the so-called livereload server. In a Docker setup, we need a static port, which is exposed by the container.
-
Open the Terminal and navigate to the SAPUI5 project.
-
Open the SAPUI5 project in VS Code.
-
In VS Code, open the
docker-compose.ymlin the root directory of the SAPUI5 project. -
Adjust the
grunt servecommand by adding the--lr-server-port=35731parameter:npx grunt serve --lr-server-port=35731
-
In the
portssection, expose port35731to the same external port:- 35731:35731
-
In the Terminal, execute Docker Compose with
docker-compose up -dagain. Everything should start as usual. -
In the browser, navigate to localhost:8000/webapp and you should see the SAPUI5 application.
-
In VS Code, open the file
webapp/view/Main.view.xml. Find theTitleelement in the XML and change thetextattribute (around line 15). And save the file. -
In the browser, you should see that the page automatically refreshes and that the title is displayed.
-
🎉 You successfully enabled Livereload for SAPUI5 in Docker!
Exercise 10.02 - Enabling Livereload in Docker Compose for Java with Spring Boot
Step 1 - Enable Livereload for Java with Spring Boot
As livereload with Spring Boot works a bit different than with SAPUI5, it’s not sufficient to just expose a port in Docker Compose. With Spring Boot, there is a dedicated RemoteSpringApplication that we need to start in VS Code, which will keep the Docker container in sync.
-
Open the Terminal and navigate to the Docker Playground project:
cd ~/ibso-tools-bootcamp/docker-playground
-
Execute Docker Compose with
docker-compose up -d. Everything should start as usual. -
Open the Java project in VS Code.
-
In VS Code, in the icon bar on the far left, click on the beatle icon to open the Run and Debug view.
-
In the menu on the left, click on create a launch.json file and select Java from the menu to initialize a metadata file about different configurations to start your Java application. If you already have a file, click on the gear icon at the top of the menu to open it.
launch.json -
In the
launch.jsonfile, add the highlighted lines to theconfigurationarray of the file:{
// Use IntelliSense to learn about possible attributes.
// Hover to view descriptions of existing attributes.
// For more information, visit: https://go.microsoft.com/fwlink/?linkid=830387
"version": "0.2.0",
"configurations": [
{
"type": "java",
"name": "bulletinboard-backend-java devtools",
"request": "launch",
"mainClass": "org.springframework.boot.devtools.RemoteSpringApplication",
"args": "http://localhost:8085"
},
...
]
} -
Make sure to Save the changes.
-
In the blue bar at the bottom, click on the run icon and select bulletinboard-backend-java devtools to start the
RemoteSpringApplication. -
Open the
HelloWorldController.javafile and change theHello Worldtext and save your changes. Within a few seconds, the Java server will restart. -
In the browser, navigate to localhost:8085/hello/World and you should see your updated text without having to restart Docker Compose.
-
In VS Code, in the hovering menu at the center, click on the red rectangle to stop the the
RemoteSpringApplication. -
🎉 You successfully ran livereload with the RemoteSpringApplication!
Exercise 10.03 - Enabling Debugging in Docker Compose for Java
Step 1 - Enable Debugging for Java
As debugging Java works via ports, we need expose the respective ports in the Docker setup. Also, as the Java application fully runs in Docker, there’s a bit more that needs to be done than just pressing the Debug button in VS Code.
-
Open the Terminal and navigate to the Java project.
-
Open the Java project in VS Code.
-
In VS Code, open the
docker-compose.ymlin the root directory of the Java project. -
Add the following parameters to the end of the
mvncommand to run the Java application in a mode where it can be debugged:-Dspring-boot.run.jvmArguments="-Xdebug -Xrunjdwp:transport=dt_socket,server=y,suspend=n,address=5005"
About the additional arguments
We are passing some specific arguments to the Java Virtual Machine (JVM) that enable remote debugging. They make the JVM start in debug mode and debuggers can attach to port
5005. -
In the
portssection, expose port5005to the same external port. -
In the Terminal, execute Docker Compose with
docker-compose up -dagain. Everything should start as usual. When you log into the log, just before the large Spring ASCII art is logged, you should see the following:Listening for transport dt_socket at address: 5005
-
In VS Code, in the icon bar on the far left, click on the beatle icon to open the Run and Debug view.
-
In the menu on the left, click on create a launch.json file and select Java from the menu to initialize a metadata file about different configurations to start your Java application. If you already have a
launch.jsonfile, click on the gear icon at the top of the menu to open it. -
In the
launch.jsonfile, add the highlighted lines to theconfigurationarray of the file:{
// Use IntelliSense to learn about possible attributes.
// Hover to view descriptions of existing attributes.
// For more information, visit: https://go.microsoft.com/fwlink/?linkid=830387
"version": "0.2.0",
"configurations": [
{
"type": "java",
"name": "Debug in Docker",
"request": "attach",
"hostName": "localhost",
"port": 5005
},
...
]
} -
Make sure to Save the changes.
-
In the blue bar at the bottom, click on the run icon and select Debug in Docker attach the debugger to the Docker container.
-
Open the
HelloWorldController.javafile and set a breakpoint in thesayHellomethod. You can set a breakpoint by clicking just left of the line number in VS Code. -
In the browser, navigate to localhost:8085/hello/World and you should see that there is no immediate response. Instead, the processing of the request is stopped because of the breakpoint.
-
In VS Code, in the hovering menu at the center, click on the blue run icon to continue with the script execution.
-
🎉 You successfully debugged your dockerized Java project!
 微信
微信- 支付宝