SAP_IBSO_TOOLS_PART2
Exercise 01 - Building and Running a Java Project with Maven
-
Turn off the automount and autoApendWindowsPath
vim /etc/wsl.conf
write these info to the wsl.conf file
[interop]
appendWindowsPath = false
[automount]
enabled = falseterminate the wsl
wsl -t ${your Distribution}
restart wsl2
wsl -
Java Environment in WSL2
sudo apt install openjdk-11-jdk
vim /etc/profile
add these info
export JAVA_HOME=/usr/lib/jvm/java-11-openjdk-amd64
export PATH=$PATH:$JAVA_HOME/bin -
Maven Environment
sudo apt install maven
vim /etc/profile
add these info
export MAVEN_HOME=/usr/share/maven
export PATH=$PATH:$MAVEN_HOME/bin -
get project zip and unzip:📥 ibso-tools-bootcamp/bulletinboard-backend-java
unzip -n bulletinboard-backend-java-sol00-starter.zip
-
cd into Home dir of the demo project
ls -a

-
clean package and deploy the project
clean target packages
mvn clean
clean target packages and depoly
mvn clean verify
or use command provided by the Spring Boot Maven Plugin that is listed in the build plugins section as spring-boot-maven-plugin.
mvn spring-boot:run

Exercise 02 - Building and Running a SAPUI5 Project with Node.js and Grunt
-
get SAPUI5 project and unzip :📥 ibso-tools-bootcamp/bulletinboard-frontend-ui5
unzip -n bulletinboard-frontend-ui5-sol00-starter.zip
-
set up Nodejs environment
- Get nvm :version manager
curl -o- https://raw.githubusercontent.com/nvm-sh/nvm/v0.39.1/install.sh | bash
- Install node:
install stable
nvm install --lts
install latest
nvm install node -
Cd into project module
-
Initialize a Node.js package
will create package.json
npm init --yes -
Use eslint to do static check
install eslint node package
npm install --save-dev eslint -
Run eslint
- Use command directly
npx eslint --no-eslintrc webapp/**/*.js
- Create a script shortcut in the
package.jsonfile
#change "test": "echo \"Error: no test specified\" && exit 1"
"test": "eslint --no-eslintrc webapp/**/*.js"- Use npm command to run eslint
npm test
-
Use Grunt for Building a Zip File of the UI5 Project
-
Cd into root directory of the UI5 project install
gruntandgrunt-contrib-compressnpm install --global grunt-cli
npm install --save-dev grunt
npm install --save-dev grunt-contrib-compress -
configure any Grunt task such as the
compresstask, we need to create the fileGruntfile.jsin the root directory of our UI5 project -
Add the following lines to your newly created
Gruntfile.js:module.exports = function(grunt) {
// Task configuration
grunt.initConfig({
compress: {
main: {
options: {
archive: 'dist/archive.zip'
},
files: [{
expand: true,
cwd: 'webapp',
src: '**'
}]
}
}
});
// Load the plugin that provides the "compress" task
grunt.loadNpmTasks('grunt-contrib-compress');
// Custom task(s)
grunt.registerTask('build', ['compress']);
}; -
Execute grunt task
npx grunt compress
or
npx grunt build -
If succeed,you can find
dist/archive.zipfile is re-created.
Exercise 03 - Setting up the SAPUI5 Project with the IBSO UI5 Tools
-
Install the latest version of
generator-custdev-sapui5npm install generator-custdev-sapui5 --save-dev
-
Start the generator-custdev-sapui5 tool from that directory with the following command
npx generator-ui5
-
Answer the questions by using arrow keys or entering the following
Prompt Value What kind of project do you want to generate? choose only infrastructure to link existing SAPUI5 apps and libs What dev landscape do you want to use? choose Dev@SAP Your project name: confirm the proposed name What version of SAPUI5 do you want to use? type 1.72.5Where is the SAPUI5 framework located for local testing? choose remotely on a server (e.g. HCP, ABAP System) Where are the SAPUI5 resources located? enter https://openui5.hana.ondemand.com/1.72.5/resourcesWhere are the SAPUI5 test-resources located? enter https://openui5.hana.ondemand.com/1.72.5/test-resourcesDuring generation, you will get the message that there is a conflict, as the
package.jsonalready exists in the project directory. Answer the question Overwrite package.json? with y (for yes) and press ENTER to confirm. Do the same for theGruntfile.jsand.gitignore. -
Run application locally
npx grunt serve --open
-
The web server is started on localhost:8000 and the browser opens automatically (option:
--open) in the root directory of the UI5 project. As there is noindex.htmlin the root directory, we only see a file browser. Click on the folderwebapp. Theindex.htmlof that folder is loaded and the UI5 application is started. -
As we don’t always want to manually navigate to the
index.htmlfile, we can specify in thepackage.jsonwhat file to open when--openis used. -
Modify
package.json"sapui5": {
"version": "1.72.5",
"resources": "https://openui5.hana.ondemand.com/1.72.5/resources",
"testResources": "https://openui5.hana.ondemand.com/1.72.5/test-resources",
"defaultPage": "webapp/index.html",
"libs": {},
"apps": {
"bulletinboard-frontend-ui5": {
"namespace": "com.sap.ibso.bb",
"resources": "webapp",
"testResources": "webapp/test"
}
},
"proxies": {},
"profiles": {}
}
-
-
Get Familiar with the Available Grunt Tasks
more info : a lot more
Some useful commands:
grunt eslintruns static code checks via eslintgrunt testruns all the automated tests of the projectgrunt buildcreates preload files and and a zip archive
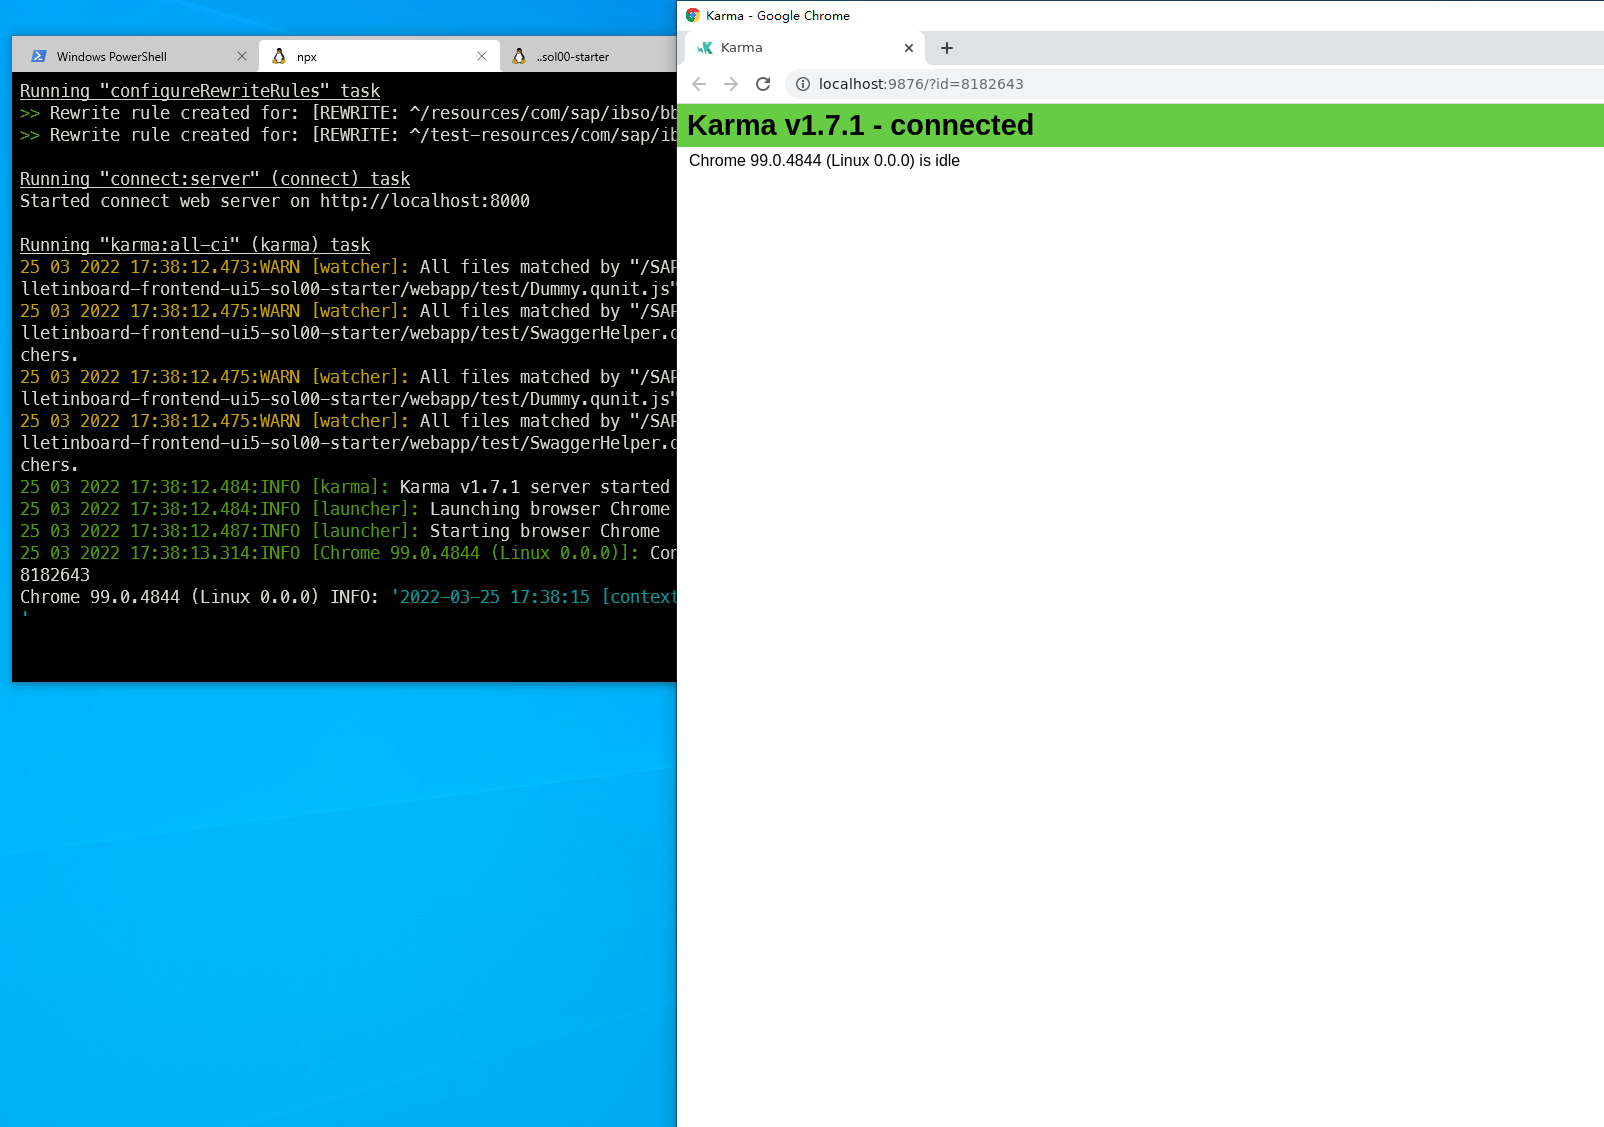
NOTE:When run
grunt testit will start a karma test and use chrome to do the test,thus need to configue chrome in WSL2-
Install chrome
sudo apt-get update

wget https://dl.google.com/linux/direct/google-chrome-stable_current_amd64.deb

sudo apt install ./google-chrome-stable_current_amd64.deb -
Make sure if it worked
google-chrome --version
-
Install ChromeDriver
check version
chrome_driver=$(curl "https://chromedriver.storage.googleapis.com/LATEST_RELEASE") && \
echo "$chrome_driver"download
curl -Lo chromedriver_linux64.zip "https://chromedriver.storage.googleapis.com/\
{chrome_driver}/chromedriver_linux64.zip"
unzip
unzip chromedriver_linux64.zip
move to /usr/bin
sudo mv chromedriver /usr/bin/chromedriver -
Check if it worked
chromedriver --version
-
Install X Server
Download and install VcXsrv in Windows. Once installed, run
xlaunch.exe(from the VcXsrv folder in Program Files). You can leave most of the settings as default, but make sure to check “Disable access control”. Allow it through the firewall if prompted when you first run it.In Linux the
DISPLAYenvironment variable tells GUI applications at which IP address the X Server is that we want to use. Since in WSL2 the IP address of Windows land is not localhost anymore, we need to setDISPLAYto the correct IP address:I recommend you put this in your
.bashrcor/etc/profilewhatever the equivalent is for your distro.export DISPLAY=$(cat /etc/resolv.conf | grep nameserver | awk '{print $2; exit;}'):0.0
-
Run command not with root user
npx grunt test
-
Successful
Exercise 04 - Changing the Java Project Efficiently
In this exercise, you will import the Java project into Visual Studio Code and enable the Spring Boot devtools.
Step 1 Import Java Project into Visual Studio Code
-
Import the project in Visual Studio Code
-
cd into root of the project
-
open VS code by command
code .
Step 2 Enable Live Reload for Spring Boot
-
find the dependency file
pom.xmland open it add following dependency<dependency>
<groupId>org.springframework.boot</groupId>
<artifactId>spring-boot-devtools</artifactId>
<scope>runtime</scope>
</dependency>
Step 3 Test Live Reload with Spring Boot
-
In the Terminal, make sure are in the root directory of your Java project.
-
Run the Java project with
mvn spring-boot:runas we did in a previous exercise. -
Open localhost:8080/hello/World in the browser to see the test page of the Java project.
-
Arrange your windows so that you see the Terminal and VS Code at the same time.
-
In VS Code, expand the
src/main/javafolder. It contains the productive source code. -
Expand all elements to the
com.sap.ibso.ato.training.tools.controllernamespace and open theHelloWorldController.javafile. -
Find the following line in the file:
return "Hello "+ name + "!";
-
Change the line, e.g. by changing
Helloto something else (e.g.HolaorBonjour). Once you save the file, e.g. with CTRL + S, VS Code will compile your changes. The compilation process updates the classpath, which is detected by the Spring Boot devtools. The devtools then restart the server. In the Terminal, you should see some traffic, which is exactly the server restarting. -
In the browser, refresh the Hello World test page.
Exercise 05 - Changing the UI5 Project Efficiently
Step 1 - Test Live Reload with the UI5 Application
-
cd into root directory of the UI5 project
-
Open project in VS code
code .
-
start the server
npx grunt serve --open
-
Make sure you see the UI5 application in the browser or open localhost:8000/webapp manually.
-
In VS Code, open the file
webapp/view/Main.view.xml. Look for the line<Title text="Ads" level="H2"/>(line 15) and change the title fromAdstoAdvertisements. -
refresh the page
Step 2 - Call the Java Application from the UI5 Application(CORS)
-
start Java application in the root of the Java project
mvn spring-boot:run
-
Check the Advertisements API of the Java application via the browser:
-
Advertisements Service: localhost:8080/api/v1/ads (should be an empty array)
-
Documentation of the Services: localhost:8080/v2/api-docs (Swagger API metadata as JSON)
About Swagger
Swagger allows you to describe the structure of APIs so that machines can read them. By reading API’s structure, swagger can automatically build interactive API documentation as well as generate client libraries for the API in many languages. You can have a look at the swagger API documentation of our java application here.
-
-
In the browser, switch back to the UI5 application (localhost:8000/webapp).Open the Developer Tools by pressing F12 or clicking on the settings button in Chrome (icon with three dots) and selecting More Tools > Developer tools. In the Developer tools, click on the Network tab.
Refresh the page in the browser and you will see a request api-docs on the Network tab, which fails. If you click on it and look at the details of this request, you will see that the request is sent to
localhost:8000/v2/api-docsand returns with status404 - Not found. Note the port number8000, but the Java application is listening to port8080.About cross-origin requests
We could try changing the UI5 application so that it directly goes to the Java application on port
8080. If we did that and ran the UI5 application again, Chrome (or any browser for that matter) would show a CORS error. CORS stands for Cross-Origin Resource Sharing.CORS is typically disabled for security reasons and prevents that a web page can send an HTTP request to a different host (aka origin). In our case, it prevents that the UI5 application on
8000can send requests to8080.Although we can disable CORS for development purposes, we still need to build our application in a way that it works even when CORS is enabled, as this is how most people would be using our application in production.
That’s why web applications are usually built in a way that all requests in the browser are sent to the same host and the web server then proxies the requests to a different host. This is called reverse proxy and is another feature that is supported by the
custdev-sapui5-infra-utiltool. -
We have to configure a reverse proxy in the
package.json, so that certain requests from the UI5 application (on8000) are forwarded to the Java application (on8080).Open the file
package.jsonin VS Code and replace the line"proxies": {},with the highlighted code:"sapui5": {
"version": "1.72.5",
"resources": "https://openui5.hana.ondemand.com/1.72.5/resources",
"testResources": "https://openui5.hana.ondemand.com/1.72.5/test-resources",
"defaultPage": "webapp/index.html",
"libs": {},
"apps": {
"bulletinboard-frontend-ui5": {
"namespace": "com.sap.ibso.bb",
"resources": "webapp",
"testResources": "webapp/test"
}
},
"proxies": {
"ads": {
"context": "^/api/v1/(.*)$",
"uri": "http://localhost:8080/api/v1/$1"
},
"swagger": {
"context": "^/v2/(.*)$",
"uri": "http://localhost:8080/v2/$1"
}
},
"profiles": {}
} -
After saving the changes in
package.json, restart your web server for the UI5 application. In the Terminal, stop the server with CTRL + C and run it again withgrunt serve --open. -
Have a look at the Developer Tools in the browser (F12 + refresh the web page). On the Network tab, you will see now the two requests: api-docs and ads, which both came back with status 200.
-
Now let’s add some data to the bulletinboard! Add a new advertisement via the ➕ button on the top right corner, enter a name and save the advertisement. If you refresh the page, you will still see the data you entered previously. Even if you stop and start the UI5 application again, you still will see the data.
- 微信
- 支付宝